Showing posts with label bike. Show all posts

Wednesday, 21 February 2024

News just in (DOH): bike gear cable housings are disposable items (as well as cables)

My current non-mountainbike stopped shifting gears on rear completely. 

Rear cable frayed when I went to clean and lubricate it.

Short cable housing by rear derailleur only allows stiff cable movement. 

For bikes under lighter use the gears have less changes (per year) so it can be many years before changes to gear cables and/or gear cables housing are needed but bikes under more frequent or harder use will need gear cable housing and cable changes.

I can confirm this need to replace cables/housing for bikes that I had for longer periods (unfortunately when younger my bikes could last just from 1 to 5 years before being beaten up or stolen!). My bikes have decent use a few times a week and there are hills/wind/traffic lights/etc and multiple gear shifts required every trip. Bikes have had reasonable maintenance including cable lubing and derailleur clean/lube and cable replacement. With bikes that I have had for longer times gear shifting eventually gets harder and sometimes cable snaps (snap can be near rear derailleur or at shifter) before I got to replacing.

After experiencing this now on a couple of bikes the penny has dropped. I would maintain the cables ok and replace when problems but eventually they became problematic even after new replace => HOUSING is the problem. 

Anyway I'm learning here which is good.


TLDR; summary from some web grepping:
1. cables and housings wear and do need replacing before there are problems, replacement period depends on amount of use of the bike and gears.
1.1 Somewhat surprising the cable housing needs to be replaced more often than the cables.
1.2 The housing that bends right around by rear derailleur (or other bend points) can be especially a point of wear.
2. Cable might not need replacing but of course it is difficult to avoid fraying/damage.


https://www.google.com/search?q=bikes+how+long+between+gear+cable+changes
https://www.cyclechat.net/threads/when-to-change-gear-cables.245958/#:~:text=The%20outer%20cable%20where%20it,used%20on%20wet%20salty%20roads.
4 years old bike/cables well maintained, how often others change their gear cables ?
inners and outers ought to be done at the same time?
"Outers are a different kettle of fish and can need changing annually or more frequently in some instances."
"The outer cable where it curves round to the RD needs changing every 6 months if used on wet salty roads." - defo seems applicable to my situation
"The RD will be fine as the pivots last for years. Just change the jockey wheels."
"Absolutely no point changing the inners without doing the outers. The inners are just metal and can be cleaned up and lubed. The outers have a nylon type liner that gets worn, gets contaminated and loses the factory installed lubrication, the outers have by far the biggest effect on the cable/shifting performance."


https://bicycles.stackexchange.com/questions/34725/when-is-it-time-to-replace-the-gear-cable-housing


https://www.bikeforums.net/bicycle-mechanics/1240252-how-long-do-rear-derailleur-cables-last.html
"Your resulta are about on par with expectations. 3-5000 miles for a right shifter is pretty common depending on how often you shift. I've never worn a left (front) shift cable. I'd venture 10k plus but, you never know. YMMV."
"Why didn't you use a tool from your fix-it kit & drive the "H" screw all the way in to a better cog? I'm sure the 14, 15, or 16 cog would've been nicer than the 11 all the way at the bottom."

https://www.reddit.com/r/bikewrench/comments/9xaevo/roadies_how_often_do_you_change_your_housings_and/
"Housing needs to be replaced when it loses integrity (rare) or noticeably increases friction (common). The latter is either from rust at the ends or from inner liner wear at hard bends (mostly brake housing under the bar tape). Dirt, grease, and distortion at the ferrule interface can also add friction, though correcting this may not require new housing."


https://www.sheldonbrown.com/cables.html

https://sheldonbrown.com/cable-installation.html

Interesting, does not talk about housing replacement but does mention modern plastic lined cables are different, lubrication not recommended, maybe. (grease/oil breaks down plastic lining maybe). Older housings maybe did last forever if cleaned/greased/oiled. 

"Cable Lubrication

In the old days, before the development of plastic-lined housing, it was necessary to coat the inner cable with light grease or heavy oil.

Modern plastic-lined cables have made the use of grease inappropriate, because the viscosity of the grease makes for sluggish cable movement. This is a more critical concern with modern brake and gear systems that use weaker return springs, and with indexed shifting in general.

Many manufacturers now recommend against using any lubrication on cables. It certainly should be avoided with sealed systems such as Gore-Tex ®. Bicycles used in wet conditions, however, will often benefit by the application of a bit of oil, more as a rust-preventive than as a lubricant. The area of particular concern is the short loop of housing which carries the rear derailer cable around from the chainstay to the derailer.

Some bicycles provide awkward cable routing which forces housing to enter cable stops/adjusting barrels at a fairly sharp angle. This is particularly common on rear cantilever brakes. It often helps to put a bit of grease on the bit of cable that runs through such fittings."


Sunday, 25 June 2023

Garmin Instinct activity watch - MENUs diagram


draw.io diagram:

https://drive.google.com/file/d/1EA5oul8p2P3p4ICDXuLvY8S5_BKNQznF/view?usp=sharing

png:

Garmin Instinct watch - MENUs diagram - quickstart - not comprehensive menus but where top-level stuff is. Button press (order left then right top to bottom 1 5 4 2 3):
Button function: LIGHT/UP/DOWN/OK/BACK
Button single press: Ctrl/widget UP/DOWN/activity/x
Button long press: ON/MENU(custom)/ABC(Alti/Barom/Compass)/Location save/Timers menu


https://www8.garmin.com/manuals/webhelp/instinct/EN-US/Instinct_OM_EN-US.pdf


Quite liking birthday present.

Great activity tracking GPS record track e.g. for mountain bike runs.


Saturday, 6 June 2020

Bleed Shimano disc brakes front and rear. Comprehensive method.


My first full hydraulic brake bleed . . . using the proper tools!
I have done many quick bubble bleeds but not full bleed before.
I got a reasonably cheap and very cheerful yellow multi-brand brake bleeding kit.


It's very straight-forward with shimano.
The same, a bit more fluid spilled with magura.

Bleeding disc brakes there seems to be a few variants on how to do it, gravity bleed from top. Push fluid up from caliper. Both ways. And there are a few optional lever wriggles to eliminate air from system that vary a bit also. I'm trying to find a simple method that works for me.

My brakes are on the road and off road occasionally and pick up lots of grime and gunge so generally the brake caliper is filthy inside and out. So good to clean everything.

GMBN have 2 videos, pretty close to how Dealer's manual say to do it.
So best steps I think following Dealer's manual closely (but cleaning as we go):

0. Collect tools and cleaning cloths, warm soapy water. 
    Clean everything as we go.
    Raise bike so caliper is at lowest point.
    (Note: for rear brake front handlebars probably need to be raised higher.)
    Set out a lunchbox for keeping small bits safe and for drying brake pads.

    Mineral oils are interchangable, different colours can tell you when you have done full bleed.

    Shimano Red was in my front brake as expected but blue blood was in my rear!
    There was a little bit of contamination front and rear but not too bad.

1. Raise brake lever to parallel.
    Freestroke all the way in. (oops - I didn't do this)

2. Remove wheel. Remove brake pads. Push back Pistons. Fit bleed block spacer. Clean things.

   Plastic tyre tool preferred to push back pistons but flat-headed screwdriver might be needed.
   Opening the lever reservoir might help push pistons back. 

   Fit in bleed block spacer.

  Inspect pads & clean caliper and rotor and maybe pads (VERY carefully) if they are contaminated.
  Set out to dry. Wipe off later with clean paper towels.
  Do not touch the face of the brake pads more than necessary. Use very clean brushes/other.
  Today rosemary sticks and leaves were used! !? yeah.

3. Remove plug nut at lever (careful of the o ring, keep it with the nut.)
    Gently screw on bleed cup (plugged).
    
4. At caliper, remove dust protector. 
    Prepare syringe hose with open hose end.
    Have 7mm wrench or allen/torx of right size ready for opening caliper.
    Fill syringe with clean mineral oil.
    Attach syringe to caliper nipple.

5. Unplug the cup at lever. 
    Open the caliper (1/8 or 1/4 turn). 
    Push syringe and push hydraulic fluid into caliper. (one video does a little pull here)
    If it is reluctant to go don't push too hard! Check correct lever is open. Open caliper a bit more.
    You will hear and see it coming into cup.
    Tap brake hose and caliper as you do this.

5.1. When all oil is pushed in then close the caliper.
       Plug the cup. Take it off. Pour old oil into old oil container. 

5.2 Kind of optional steps, reverse bleed, lever wriggles/squeezes, freestroke and lever adjust.
    Put cup on again. Put some some clean oil into cup.

5.2.1 Open caliper, reverse bleed (using bottle/baggy) to eliminate caliper air.
         Tap caliper and brake hose.

5.2.2 With brake lever pressed do quick open/close of caliper. 2 or 3 times.

5.2.3 Finished at caliper now. Wipe off. Plug. 

5.2.4 At lever squeeze lever in and out a few times, flick it a few times, 
          wriggle lever angle up and down, 
          screw in freestroke and lever adjust.
        Watch for bubbles coming up into cup.

5.3 Take off cup, replace lever plug nut and o ring.
    Oil flush with top, don't introduce air.

6. Finishing  up . . . brake pads back in . . wheel on.

    Wipe off and dry caliper, brake pads and rotor.
    Remove bleed block spacer.
    Re-install brake pads.
    Put wheel back on.
    Check wheel spins ok, pads free of rotor.

7. Put lever back in position.

   Squeeze lever a few times to move pistons back in so that pads grip rotor. 

Test ride. Careful now.

8. Clean syringe and bleed tools with soapy/wash up liquid warm water.

   Dry.

   Tidy away tools etc.


My commuter Ridgeback vanteo has shimano hydraulic brakes front and rear.
Front brake lever & caliper replaced a few years ago after lever damaged.

Front brake lever on right, shiny silver Shimano De-ore XT freestroke.
Front brake caliper has nipple at highest point and 7mm wrench nut on nipple to open at the caliper.

Rear brake lever on left, all black, original that came with bike.
Very little markings on lever or caliper except for Shimano and very small BL-MS55(or M855?) Malaysia 22.2. ? so maybe of the BL-M8000 series ?
The caliper has bleed nipple cover flush with side of caliper and separate bleed screw. 
A bit easier to use.

Rear brake lever - original to bike - on left.

BL-M855 ?

Rear brake caliper - FILTHY

Front brake lever on right.

Front brake caliper, pretty grubby. FILTHY inside.
Front brake caliper, a bit cleaner, with spacing block fitted.

FILTHY. Washing up liquid and rosemary to scrub.

Brake pad surface. Don't touch. ALOT cleaner.


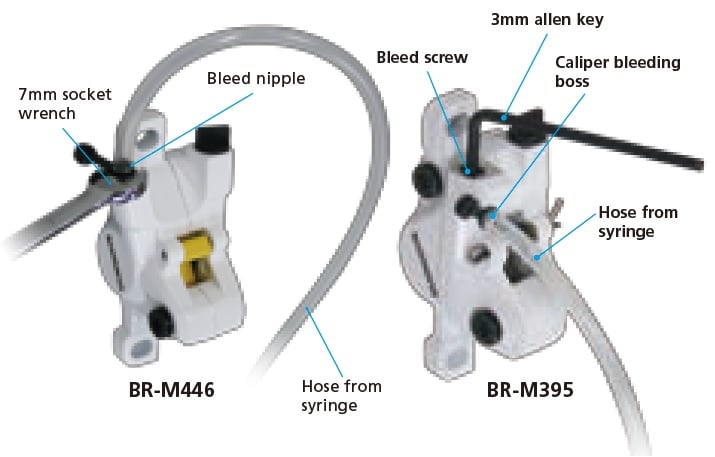
Diagrams here, 
 my front caliper is like the BR-M446 with 7mm wrench at bleed nipple,
 my rear caliper is like the BR-M395 with bleed nipple to side(but flush into caliper not sticking out) and separate bleed screw at 90 degrees. Easier to use.


6/6/2020Front and rear brake fluid replace/bleed.
31/5/2020http://gaoithe.blogspot.com/2020/05/cycle-over-to-ballycorus-and.html
MTB brakes out of action
lots of cycles on this bike
including MTB side of three rock like today, brakes went very squidgy not good on rattly MTB downhill run!! :-o Scary!
Got a bit more brake by adjusting at the lever.
When they cooled down and had a rest they came back.


RESOURCES:

12 steps, pretty good. Gravity bleed from top cup to bottom.
https://www.worldwidecyclery.com/blogs/worldwide-cyclery-blog/how-to-bleeding-shimano-brakes

Dealer's Manual Shimano Hydraulic Disc brakes
Cup on, syringe fluid in from bottom.
Then allow some back down gravity to eliminate air.
Lever squeeze and caliper quick open/close.
Lever action to eliminate air bubbles (and freestroke/lever adjust in other vid) cable and lever tilts/wriggles.

GMBN - How to Bleed Shimano Disc Brakes – Mountain Bike Maintenance
https://www.youtube.com/watch?v=COLd57jDvOE
Looks like genuine bleed. Dirty fluid comes out top.
Cup on, syringe fluid in from bottom.
Pro tip lever squeeze and caliper quick open/close allow fluid back down get air out of caliper reservoir.

GMBN tech - Bleeding A Shimano Disc Brake In Real Time  - 19 mins
https://www.youtube.com/watch?v=HggV5BFTRw8
Cup on, syringe fluid in from bottom.
Freestroke lever wriggles.
CLEAN everything.

GCN - How To Bleed Shimano Hydraulic Disc Brakeshttps://www.youtube.com/watch?time_continue=22&v=DsqlEYJeLQU
Cup on, syringe fluid in from bottom.
Simple, skips the fiddly extra air elimination steps.


future fun: DMW on bike . . .
maybe good for scout planning routes: https://www.dublinmountains.ie/fileadmin/user_upload/maps/dmw_map1_threerock_shankill_260418.pdf
 and  https://www.dublinmountains.ie/index.php?id=135 and https://www.dublinmountains.ie/fileadmin/user_upload/maps/kilmashogue_tiknock_all_routes.pdf


Saturday, 23 May 2020

lifeHack: edit route in viewRanger, export gpx, upload to google drive, import into BeeLine app, follow route.

Went for a #within5km bigish cycle on the weekend.
I used the Beeline device and found that it worked quite well.

Long long ago with a motorola phone I found the Bluetooth and Beeline device lost communication with each other too often so it just didn't work :-(. Nowadays I have a Huawei P9 and it works well.

Happy with this process: Edit the route in viewRanger, exported to gpx, upload to google drive, import into BeeLine app, follow route. What I _actually_ did was start editing route in Beeline app, that was not great for the route up over the forest trails, so I looked into editing route in Strava. Found that yes, I could do that if I start a free 60 day Strava subscription. I found you can import any .gpx into Beeline**. (**later discovered any .gpx BUT Android app limits importing file from a small set of slightly inconvenient locations on phone AND seems to not find .gpx files in certain folders ? - that part of the app needs some work). So I edited route quickly in ViewRanger, routing for bike, turning off routing where open-street-map route did not know about connections. Routing for bike in ViewRanger on occasion actually finds some new cycle paths that I didn't know about and are good route options. So happy with that! Then as I have said importing the .gpx file into the Beeline app was not as straightforward as it might have been!! I used filemanagers to copy the .gpx file to various locations but the Beeline app still didn't seem to pick up the file. Finally putting the .gpx file into google drive and import into Beeline worked. Then follow route.

The route created: 55km circuit including some forest trails, mostly on road:
https://my.viewranger.com/route/details/MzA1MDc0Nw==

On following the route the beeline device is mostly intuitive.
It moves on automatically to next route point.

But if I skipped a part of route or bypassed a point the Beeline stayed pointing to the last route point.
(It sort-of makes sense you cannot automatically move on as routes could loop or re-use points but it would not be that hard to check in software that your route doesn't overlap or re-use points.) I found later how to do it on device. The route arrow should go black, then you can tap on the top arrow and re-route journey == move routing on to next point.
https://ridebeeline.zendesk.com/hc/en-us/articles/360020956713-Route-Mode-vs-Compass-Mode
Or do what I did. In app on phone tap on arrow. There you can move forward or backwards through route points. Ok as I had phone in holder on my bike handlebars.

Anyway, track of the route: Within 5km Dublin Road Cycling 23 May 2020
18:40 to 22:43 == 4 hours.
Total distance: 54 km
Altitude gain: 831m
https://my.viewranger.com/track/details/MTQzNDAzMzM=

Used Beeline device to follow the route.
On forest trails with my regular commuter bike.

Highlights: JUDDERY arms and ass area well rattled and massaged to itchy rash extreme heat point from the long gravelly downhill Three Rock to Kilmashogue without suspension.
Explored the new not open Tully Church Laghanstown Park area, amused to encounter working traffic junctions on the new disconnected roads.


Process or work flows:

#1 edit route in Beeline app, follow route.

Limited to Beeline app map views map/terrain/satellite/hybrid.
Which is ok.
Can turn Route mode on or off.

#2 edit route in viewRanger, export gpx, upload to google drive, import into BeeLine app, follow route.

Route editing in viewRanger is a bit clunky but it gives you nice cycling/hiking options, better map views, combined routing and non-routing control.

Importing .gpx into Beeline app on android was a bit annoying. It would import from certain folders only, Images, Videos, . . . Not from viewRanger folder. Not from downloads folder. Eventually putting the .gpx file into drive and importing from there worked.

#3 edit route in Strava, import route directly in BeeLine app, follow route. (requires 

Beeline imports Strava routes natively.
But you have to pay for a regular Strava subscription to be able to edit routes beyond the free 60 days.


Beeline here is not the Russian mobile telephone company but the Beeline bluetooth GPS device.

Not the Droids:

https://en.wikipedia.org/wiki/Beeline_(brand) Vimpelcom Russian telecommunications

https://en.wikipedia.org/wiki/Beeline_(software_company)  SAAS Workforce Management

Yes the Droids:

https://www.kickstarter.com/projects/ridebeeline/beeline-smart-navigation-for-bicycles-made-simple/posts

https://beeline.co/ Simple, navigation for bikes/motorcycles
Simple interface.
Good design.
An arrow, pointing at destination (or next route turning point) and distance.
Clear display visible in sunlight or backlit visible in the dark.
Cute and robust design (so far).

The phone does the grunt work GPS location on and Bluetooth to communicate with Beeline.

Beeline

Thursday, 9 August 2018

diary/blog(bench repair, cycle to work, cars) and how Writing is like Engineering components that interfaces with brains

This morning mmmmhmm,
 I set off the alarm when I open the back door,
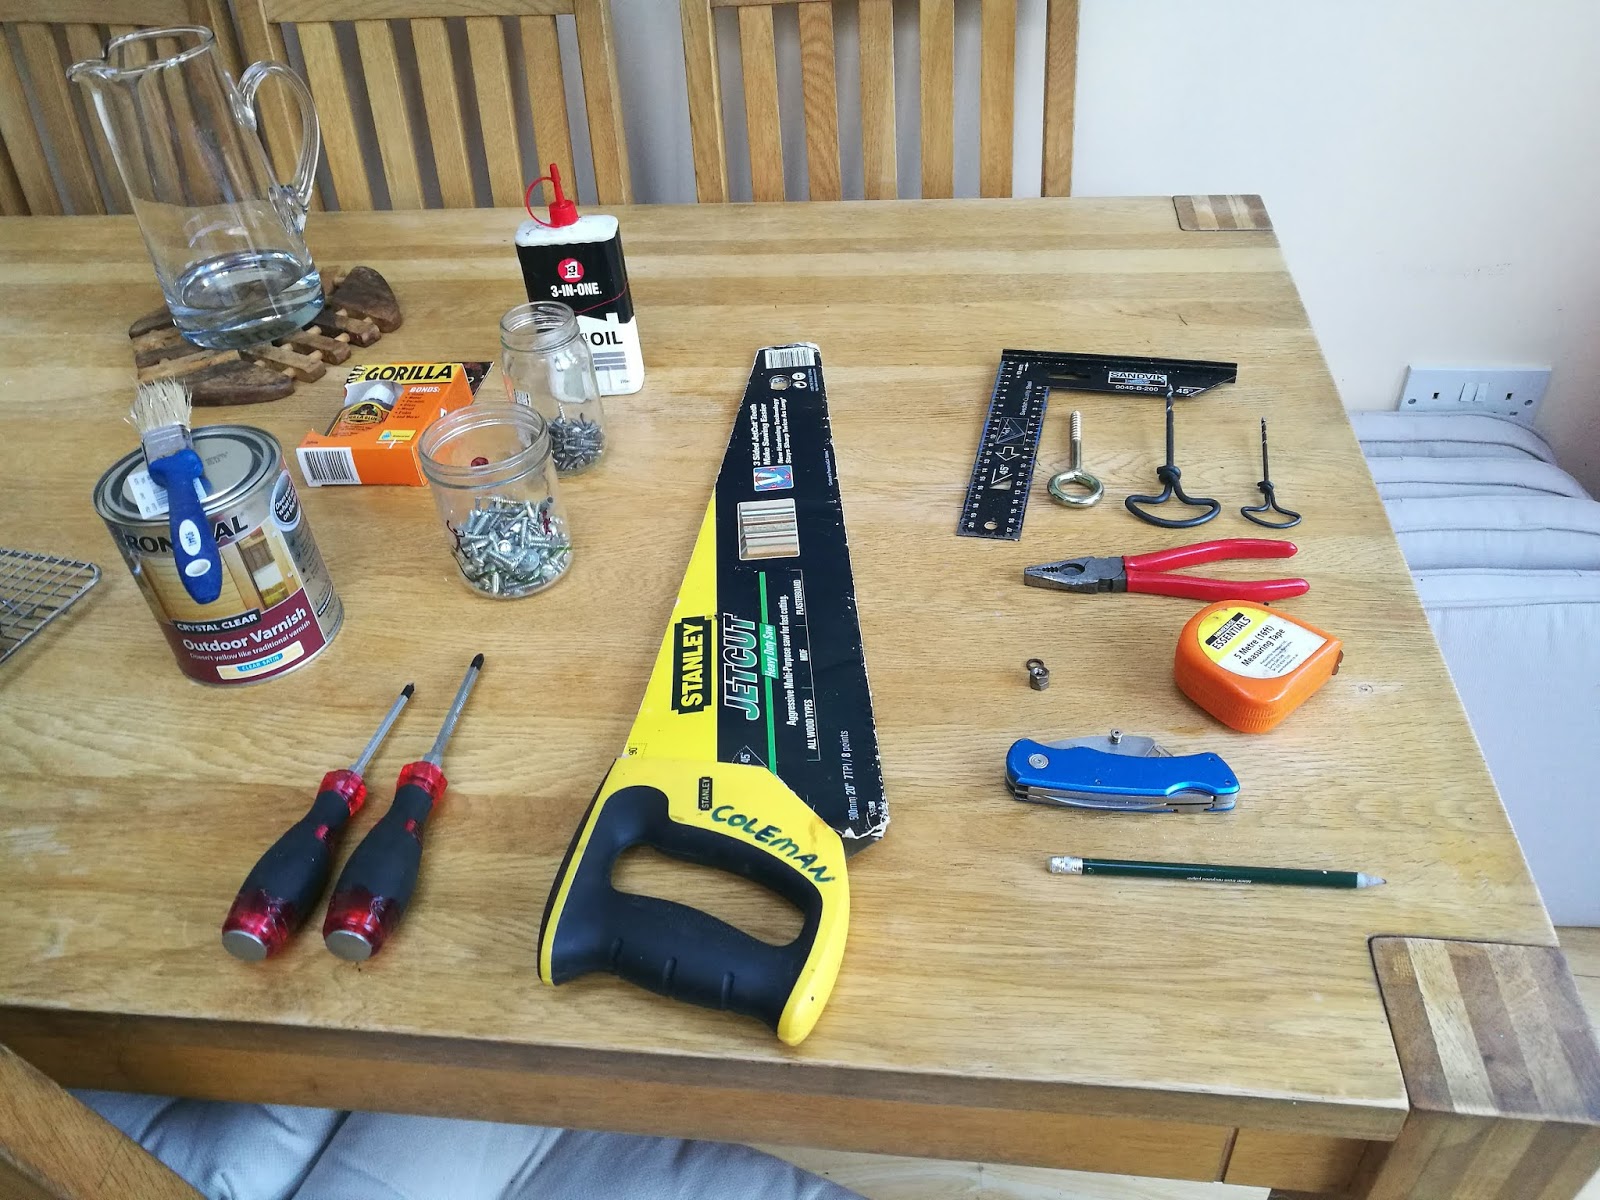
 I varnish planks for bench repair,
   I hear Fionnuala unmloading dishwasher,
  Quiet house, girls went to Cobh yesterday morning to visit
grandparents & cows & cat & dog & farm generally.
Bye to Fionn, quick coffee, cycle to ParcelMotel in Sandyford . . .
 Traffic in Sandyford village is slow, there must be a funeral ? cars
parking on pavements on the lower part of the hill away from the
shurch. I squeeze past/through.
 At the ParcelMotel bip bip bip bip bip bip - bip - wrong pin ? oops
enter mobile and pin bip * 10 bip * 6 bip kerchunk YAY.
  Unwrap. Shoe goo. - NOTE: as of 2023 TEC-7 stuff is much better for repairing boots etc . . .
   Into bag.
 Cycle on to work.
   Through Moreen, zoom cycle around roads, onto Drummartin bypass
traffic around but quiet enough,
   still it gets backed up as usual so bike catches up and undertakes
cars at each set of traffic lights,
   and I stop but then go walking pace through some red lights - very
quiet - no traffic moving through.


vibrant chain of thoughts after shower in work

Writing something is not like engineering and yet . .

With engineering each part has to function and mesh with other parts
and work together.
   The function and the mesh can be polished like a diamond or a
Toyota or a new Kia!
       And the whole works smoothly and it is a joy to behold.
   The function or the mesh might be a bit degraded,
       Yet the whole can still work albeit not perfectly.
   The function or the mesh might be degraded enough such that the
whole doesn't work any more.
   Maybe some repair could be done but it doesn't work.
The working or not working of the whole is obvious with engineering:
   a bench
   a road
   a bridge
   a canal system
   a bike
   a car
   a watch
   a computer ? maybe sometimes working is not so obvious!
   software . . . ?

With writing it is not so obvious if the parts do not work together.
   Writing has to connect with the mind of the reader,
     and mesh with modules of knowledge already there,
     and enhance some modules,
     and perhaps create new modules.
   Good writing will be efficient and state the minimum necessary to
engage with the mind of the reader.
Some writing is factual and some writing aims to impart facts and
techniques or methods.
   The mind of the reader is given information to load into modules,
   the mind of the reader is given instructions,
   so writing controls the mind and actions of the reader.
After reading,
  if the methods cannot be followed,
    it is less obvious if the writing is broken OR if the reader is
missing knowledge or skills or . . . something.
    Perhaps the writing would mesh better another reader with a
different set of knowledge.
    Perhaps the original reader would need to read other items or
practice skills before being able to understand.
    Or perhaps the writing is defective, incorrect in places or
misleading - correct but under certain conditions and complexity has
been left out.

Minimal and TLDR; versus comprehensive.
Need comprehensive yet simple documentation/info exchange, yet people
are too impatient to wait for or read comprehensive docs.
Combine writing with diagrams.
Reference to other documents. Divide up topic.

In school books were my friend.
Learning off by rote names or dates or lists of counties or chemicals
was not really my thing.
 Or poems or worse prose or irish quotes. Or french words or verbs!
 Or maths theorems.
Why learn things off if they were already written down ?
I always found that hard and convinced myself it was optional for a
clever chap like me.
 Anyway,
  somehow a decent vocabulkary of English words built up in my head.
 On occasion a more unusual word would come out in conversation
sounding normal in my head yet catching the ear of others who might
occasionally point out the novelty.
 Somehow lists of chemicals and facts about trees and physics and
maths and all sorts built up in my head.
 Some cool and simple enough poems like McCavity the Mystery cat,
Ozymandias, some Kavanagh stayed in my head for a while.
  Although the exact sequence is very hard to retain.
  As an adult learning song lyrics takes work . . and is very hard to
get to a rote state.
   First lines of verses will obstinately not pop into my head at the
right time :-7
   But with pratice and taking a step back to learn songs at different
levels works . .


With computers and software the engineering definition of "working"
seems to have become more fuzzy.
And as computers or more complexity are added into cars, washing
machines, lightbulbs the fuzzy workingness is becoming ubiquitous.
Our Renault Grande Scenic - great space inside - seats fold down to
make van space.
 Worked well for us for years, last couple of years the fundamental
problems were:
    1. air blowers stopped working, air heater stopped working,
       IF we had only known KEEP your air intakes (below windscreen
under grille at top of bonnet) free of leaves/gunk !!
    2. cylinder coil went in the end, too much to repair
 Various other issues were:
  Parking brake warning and stopped fixed nicely by Welsh parking
brake fixy people and local mechanic.
  Periodically a cylinder coil would degrade and need replacement.
  Windows:
    need to reprogram if battery went dead,
    near the end once a window went down by itself and stayed down,
for a week . . . and then started working again
       (I did clean/lubricate but not much),
    otherwise fine for us despite stories of funny window behaviour by
other owners.
  Sunroof: (need to keep lubricated - on new Kia as well)
  Seats (need to keep lubricated, clear rubbish so they fold or click
upright correctly.
  Very frequently blew light bulbs (dipped beams, main beam, others) :-P
  Keys: my key fob died and I killed it altogether trying to open the
case and solder a fix too hastily.

  Battery replaced periodically . . . serviced oil/air filters, oil,
windscreen wash . . . tyres, steering parts

The older fiesta similar major problems:
 1. Heater/air blower:
   mostly didn't work so cold and foggy windscreen in the winter
   occasionally did work but got stuck on hot so long trip down
country people overheating windows down
 2. rust underneath and coming up sides/doors
   repaired a few times to get through NCT
 Key twisty roundy needed to get replacement and program it.
 Paintwork rusty patches sprayed in very patchy manner.


Engineering software if I look at how some parts of system works . . .
Distributed system - a seemingly simple operation like checking
version - not designed, could be done in various ways. Answer now not
a simple "vx.xx.xx" but might be multiple versions + elements of
config. Complex systems. :-P  Yet not that complex. Bring back the
says of 64k RAM! Maybe :) It comes back to DESIGN. Design and
architecture of software components, how they mesh together. Same for
writing, architecture of what documents are needed, design of chapters
and diagrams, writing, implementation.


The Bench
Strong cast iron with wooden seat and wooden + cast iron back.
The wood was very poor and not treated well and started rotting very
quickly a year or so after buying bench.
I replaced most of the the bench seat planks retaining front most
curved one and rear and wood-stained all but didn't dismantle bench to
paint all surfaces. Lasted a few years with a clean and top up of
woodstain some time.

Now the planks on bench back are rotten (from the unpainted surfaces
in contact with cast iron).
And older unreplaced planks are more rotten so replacing almost all
now with new.

Measured. Bought wood. 2 planks:
 plank #1 W2 x L*2 x H
 plank #2 W x L*2+20cm*2 x H
  Let L = bench width 170mm I think.
  Let L2 = shorter plank at front ~168cm.
  Let W = 7cm new (original about 65mm) narrower planks on back sides
and on seat.
  Let W2 = 9cm new (original about 8cm) two wider planks on back.
  Let H = 18mm (or 20mm new planks (or 16mm smaller older planks)).
  For back:
    2 W2 x L x H
    2 short sides 20cm x W x H
  For seat:
    1 W x L x H at back
    1 W x L2 x H at front

Kate cut the planks to size(making a mistake cutting wide plank for
back slightly shorter length for front) but will work around that
using one narrow one wide plank on back. Kate took off one rotten
plank from front of bench. Kate hand drilled holes for front plank and
wood cracked a bit with force of bolt going in. Will varnish and
gorilla glue support the crack.
  Tue: Took rotten wood off back. Oiled bolts. Cleaned off bench/parts.
  Wed: I finished cutting. Measured and drilled bolt holes.
Sanded/cleaned wood. Applied white spirits and coat of varnish.
  Thur morn: applied another coat of varnish to new planks.
  TODO: Varnish on old wood on bench (take off all planks and do it properly?).
    Another coat of varnish on new wood.
    Assemble.
    Burn cool/cute things on backside ?


My Bike(s?):
  Pedal needs replacing on my hybrid commuter.
  And bell and water bottle holder.
  AFter JamboRi took carrier off MTB and put back on my bike and fixed
up mudguard.
  Mudguards are held with sisal and old broken bungee :-7 is ok for now.
TODO: Kate brakes, Kate mudguard lost on JamboRi I think
TODO: carrier for MTB >;) and pannier.

Friday, 8 May 2015

Ideas for support for 30k speed limit. Slogan idea: "70% Living - 30k Traffic"

"70% Living - 30k Traffic"   
 - I like this one. Implies that:
   - if you go at 20k Living gets up to 80%  :-) 
   - if you go at 40k Living goes down up to 60%   :-(

"70% Living - 30k Traffic"   
Traffic, Please Allow some Space for Living.
Be Gentle in Residential Areas.

we can draw a graph showing dominance of traffic . . . sorry! very scribbley!

Displaying DSC_0304.JPG


"The Dublin Cycling Campaign, together with Cyclist.ie, strongly support the introduction of widespread 30Kp/h zones in the city, particularly in residential streets and in the vicinity of schools. In fact we are calling for 30Kp/h to be the default speed limit in urban areas, with higher speed only allowed where they are shown to be safe."

I started with something like "Thirty Together".
But the emphasis on the speed is wrong.
The emphasis should be on Bigger Traffic taking care of Less Powerful People.

"100% Living Area - 30k Traffic Zone"

"70% Living Area - 30k Traffic Zone"

"30k for a better way" - mbleh :-P but fits in with changing priority from traffic to living

"Living Area - Traffic take care at 30k"

"Living Area - Traffic Welcome up to 30k"

Considerate traffic will already be doing 30k or less where there are vulnerable road users around.

"Take a moment to enjoy this living area at a max of 30k . . . " meh

"Welcome to this Living Area - Traffic Please be Gentle with our People"

Thirty Together - Priority for Life, Living People - Welcome to this Living Area
Traffic Tolerated at max 30kph in this Shared Living Area
Welcome to our Shared Living Area.
Priority for Living - Playing - Walking.

Emphasising 
 - sharing of space and that priority should be for living - playing - walking not for transport.
Pointing out 
 - that traffic (of all kinds bike, car, bus, truck) is bigger, more powerful than people
 - that traffic is a guest in the area
 - that traffic should treat those less powerful gently

The streets need to look like a pedestrianised district - underfoot, layout and signage.
Emphasising that motorised traffic does not have ownership of the road in the area.

With Inspiration from the Dutch woonerf - "shared street" and "car is the guest" ideas.


Inline image 1

living, residential

area, farmyard

http://m.interglot.com/nl/en/toegestaan
allowable, permitted, accepted, tolerated, admissible, permissible, tolerable, afforded

Monday, 20 October 2014

New bike lights for myself and for Kate. Moon Mask and Comet Rear and Knog Blinders. LED and USB rechargable.

Bike lights arrived today.
I especially was in need of a front light so good to have that sorted.
Charged up and ready to go . . . road test on way home.
Moon Mask and Moon Comet Rear. 
Glowey blue and orange charging lights. Mini-USB.

Also got red knog front and back for Kate.
This is the place I got them from, good price and v. good selection AND good website where can sort lights by category: 


This morning on cycle in at the junction of Baggot St. Upper, Haddington and Lemsip road just before going over the bridge on canal there was a rear bike light on ground. Totally run over and smashed. I picked it up (compulsive rubbish picker-up) to get it out of the way. It has red duct tape on it. In case someone is wondering where their rear light has gone to! It's in the bin :-7


############################################################
Selecting bike lights . . . 
There is a very big selection out there.
LED lighting and battery tech has been improving every year.
But what are good lights to buy for bike?

We got a pair of knog blinders for Daire at start of September. 
They're so small and handy and also neat/cute/cool!
I borrowed one a couple of times.

Bike shops in Dublin have some lights but there is really a much better selection at better price on the internet.
Bike Light Database . . . compare features and look at reviews.

Lights needed for James, Kate, ?Maeve, ?Fionnuala . . . 


Knog frog, cheap - coin batteries.
€23.99
coin or AAA batteries in Halfords Knog style silicone lights . . . 
coin batteries
city cycles 1 AA 10 euros

There are alot of very simple Knog frog style lights now from generic/any manufacturers.


Cycleways on Parnell St.
€139.99

Knog Blinder 1 LED Front & Rear Twin Pack
NOW€46.99   out of stock until 17/10/xxxx

Wow. A shop that allows you to categorize on rechargable lights:


CONCLUSION:
all good! But moon meteor/comet front rear prob good for me    ?or mask(better and on sale :-P)+comet?
Knog red front & rear blinder for Kate


also looks good: moon shield rear


rathfarnham


###########################################################
Fun/prezzies:    POV.    KITS      BIKEPOV for ME?Kate?Daire?  LilyPad for Kate?  And For Maeve?    
There are some cool POVs commercially available.
- SpokePOV from adafruit industries (and its i'ble)
- Monkeylectric's m132s
- Monkeylectric's recentely announced m464q


http://www.adafruit.com/products/5     SpokePOV Kit - v1.1 $37.50  + DONGLE NEEDED 
https://www.adafruit.com/products/46   USBtinyISP AVR Programmer Kit (USB SpokePOV Dongle) - v2.0 $22.00

http://www.adafruit.com/product/535   V1.1 blue mini usbtiny dongle + magnet needed 
MiniPOV 3 Kit - V 3.0 PRODUCT ID: 20 $17.50


2 images


###############################################
wearables

LilyPad Wrist Band POV by quasiben


colouring book