Sunday 28 June 2020

Bumblebees in Dublin and Limerick gardens

Thur/Fri
Very sunny, a bit breezy, occasional showers during week.

In our garden working on white clover in our grass. 
Off-white tail, with orange-yellow bands one high on thorax, other high on abdomen. 
Buff-tailed bumblebee.
Bombus terrestris.

Very big bee on flowers under Ash tree.
She is clambering around on the flowers just flying on occasion.
White tail and yellow bands one high on thorax, other high on abdomen.
?Queen? probably ? Bombus lucorum. (or Bombus magnus or Bombus cryptarum)
Also smaller regular honey bees on these flowers.
And a smaller bumblebee. 
Bombus lucorum. maybe (Bombus lucorum/Bombus terrestris workers cannot be reliably distinguished by sight).

Sunday, quite windy, showery, patches of sun.
Garden in Limerick on long funnel shaped pink/deep pink flowers.
Also on some other flowers.
Off-white or ? ginger or yellow faded tailed?
"Take care not to confuse Bombus muscorum(blond tail) & B. pascuorum(ginger tail), both of which have an entirely ginger thorax"
B muscorum, large carder bee, widespread but not common.
B pascuorum, common carder bee, "probably the most common bumblebee you will see".
So they probably are the common carder bee.

https://pollinators.ie/wordpress/wp-content/uploads/2018/05/Crash-course-in-bumblebee-identification_2018.pdf

Monday 
rain showers over night
very windy
no sign of bees.

Saturday 27 June 2020

Green party votes to enter government with FG/FF


https://twitter.com/DPMRobbins/status/1275323580314779648
Image of Greens as "a Victorian child in a temperance ballad trying to lure our drunken parents (FF/FG) out of the pub"
https://www.irishtimes.com/opinion/fintan-o-toole-greens-have-no-choice-but-to-enter-government-1.4285533
"The problem for the Greens is that, on the big issues, they’ve been proven right. "
Letter in the same paper the Greens and Climate Activists are the Realists.

https://www.irishtimes.com/opinion/i-am-young-i-am-a-green-and-i-want-to-trust-fianna-f%C3%A1il-and-fine-gael-1.4287292
"I believe that climate justice is social justice. That core green belief is woven throughout this programme for government. It can be seen in the plans for infrastructure development that are focused on housing, retrofitting and public transport. Retrofitting in particular will be aimed at the Midlands region, and on social and low-income tenancies. This will make many Irish homes warmer, more sustainable and cheaper to run for the occupants."

A bit after 8:30.
"Ireland's Green Party vote 76% in favour of coalition government "


Sat/Sun/Mon . . . Cabinet appointments are interesting . . . 

Stuns? . . Really? 
Appointing someone with Agriculture experience to the post seems good.
And someone outside Dublin/Cork (living on farm in Offaly and from Mayo originally I think)..
"Ms Hackett, a farmer from Offaly, and the party's spokesperson for Agriculture, Food, and the Marine was elected to the Seanad in a by-election in November last year. "

I would guess appointments would be discussed and a consensus reached as much as possible.


"Historic" end to civil war politics.
Michael Collins and Dev's portraits to hang together in Taoiseach's office.


The real test of the programme for government will be in the delivery of it rather than in the writing of it. Invest in homes for people. Health system. Looking after environment. Building new energy systems. 

"All three parties in this new Government believe that climate change is a defining challenge not just of this generation but of human history. The programme we have agreed puts action on climate change into the work of every part of Government."


Friday 12 June 2020

Keeping a Hiking log for Scouts (and non Scouts) (a google doc hike log template)

Copy this Google Doc Hike Log Template to your own Google Doc or start a real Log Book with pen and paper. https://docs.google.com/document/d/1KAQCEQ8oGVn9e8eqW35JnDmGn8Umg4Vzv3R9V-Kszv4/edit?usp=sharing
This Template is based on the Scouting Ireland Hillwalking Skills Hillwalking-Logbook.pdf resource.

Keeping a hiking log.

As part of hike review and hiking skills we keep a personal hike log
This is especially important when you lead hikes.
It's good to do the hike log when it is fresh in your mind.

Why keep a hike log?
 We keep logs of hikes (and other activities) to help review them and learn from them.
 A log is also necessary for the higher Hiking skills levels with Scouting or Mountaineering Ireland.
You might already have a traditional pen and paper log book.
 If you don't already have one you should start one. 
 Using a hardback A4 sized book is a good idea but other sized books work as well.
 If you like drawing pictures and maps you can include these and you might prefer to use a sketch pad.
 Or you might prefer to keep an electronic log of hikes.

What should go in a hike log ? 
 See the Scouting Ireland Hiking skills team Hillwalking-Logbook.pdf resource which can be found here:
Mountaineering Ireland have a Digital Log that can be filled in online.
  But you need to be a member to use it.

Hike number and Title, Date, Location, Map name/number,
Number in Party, Leader,
Weather,
Coordinating start/end location and lifts/meeting up,
Distance, Time, Height gain and loss.
Route Notes:
 Add text of or a link to or picture of route card.
 Type of trail (e.g. forest trails, mountain side, bog, wet/dry, rock, on road, country paths)
 Name of ways or trails used or national park.
Other Observations:
 Your personal rating of the hike 
 How did that feel? Max effort/moderate/easy/hard/tired/hot/cold/wet/dry ?  
 Links to photos/blog post
 Wildlife encountered
 Add sketches or pictures or wildlife, trees and plants, mountains and landscape
Sketch Map:
 Draw a sketch map of the route on the back 

 Sketch map or map picture or link to GPS trace map etc.

Saturday 6 June 2020

Put new Magura hydraulic brakes front and rear onto MTB.

Drizzly weather. Took bike into kitchen.

Took off old hayes so1e brakes.
Brakes totally not working. Bleed plugs & reservoirs damaged.

New Magura hydraulic brakes.
From ROSE bikes in Germany. https://www.rosebikes.com/
Magura QM 12 disc brake adapter: 7,75 €
Magura MT5 Disc Brake Set Front+ Back Wheels: 149,77 €
Shipping costs: 9,95 €

Total: 167,47 €

Put on new magura brakes.

Rear: caliper adapter attached first (RED bolt up, BLUE bolt down).
(a bit like Alice in Wonderland or the Matrix)
Remove brake spacers and fit on caliper.
Bolt lightly in place, then squeeze lever to centre caliper on rotor and tighten bolts.
(didn't cop this until a bit later)
Route cable to front of bike.

Front: caliper fits on directly.
Route cable.

Phew. Relieved the adapter was right and the front fitted without adapter. On the old rotors too.

Puzzled over which side to put levers on!
The brake instructions say put front brakes on left . . huh? Oh. Germany is like America/rest of world.
UK, Ireland, ?Aus?Can front brakes go on right.
Daire's bike has them on left!
All other bikes in house have them the other way round.
The front calipers on Fionn's and Kate's bikes look like they want to be the other way though!
Anyway.
Front brake lever on right.
Rear brake lever on left.

Cut hoses - a bit fiddly.
Measured to not have too much unnecessary hose flopping around but have enough if need to move lever to vertical. Cut with pliers. Hard to get hose inset to press in. Keep that piece vertical while remove rubber sheath, then 8mm wrench unscrew, then pull out hose. Sheath, screw piece and olive on hose. Push in and screw back firmly in place (the olive deforms to make seal). Oh awkward, when tightening the hose twists. So it has a sort of a twist kink that is hard to eliminate.

Pretty straight-forward but fluid tends to leak/escape a bit.

from Magura showing cut hose method: https://www.youtube.com/watch?v=xsSdFO89_rU
  [retrospectively: Ohhhhh. Nice. the spacers can hold the hose for pushing in the hose inset.]
  [also nice plugs 2 olives 2 hose insets came with each brake set]
Some American guy showing method . . . https://www.youtube.com/watch?v=tLLZrf_mJi8

Rear brake worked grand straight off.
Quick lever bleed for front brake.
Put lever straight, plug screw off, syringe in.
Depress and release syringe and a satisfactory amount of bubbles come up.
Repeat, work lever, tap brake cable.
Remove syringe and replace plug screw and clean afterwards.
Magura fast bleed (from Magura): https://www.youtube.com/watch?v=RtqwQB8wtYQ

Quick test, very late/early tomorrow now!! Ouch.
Job done. New brakes on. Looks good.

Old brakes and cut off hose

Rear caliper. (and adapter)

Front caliper.

Brake levers and cables at front.


Full brake bleed . . for another day:
Magura brake bleeding (from Magura): https://www.youtube.com/watch?v=GMRk916qJTg
Myeh. Annoying. Remove caliper, remove pads, in spacer. Keep caliper same height as 
Similar method from magura, authentic German mechanic: https://www.youtube.com/watch?v=bpstjYqLehI&t=401s

Park tool Magura Hydraulic brake bleeding:  
Wow. Kinda messy.
At least caliper left in place.


Bleed Shimano disc brakes front and rear. Comprehensive method.


My first full hydraulic brake bleed . . . using the proper tools!
I have done many quick bubble bleeds but not full bleed before.
I got a reasonably cheap and very cheerful yellow multi-brand brake bleeding kit.


It's very straight-forward with shimano.
The same, a bit more fluid spilled with magura.

Bleeding disc brakes there seems to be a few variants on how to do it, gravity bleed from top. Push fluid up from caliper. Both ways. And there are a few optional lever wriggles to eliminate air from system that vary a bit also. I'm trying to find a simple method that works for me.

My brakes are on the road and off road occasionally and pick up lots of grime and gunge so generally the brake caliper is filthy inside and out. So good to clean everything.

GMBN have 2 videos, pretty close to how Dealer's manual say to do it.
So best steps I think following Dealer's manual closely (but cleaning as we go):

0. Collect tools and cleaning cloths, warm soapy water. 
    Clean everything as we go.
    Raise bike so caliper is at lowest point.
    (Note: for rear brake front handlebars probably need to be raised higher.)
    Set out a lunchbox for keeping small bits safe and for drying brake pads.

    Mineral oils are interchangable, different colours can tell you when you have done full bleed.

    Shimano Red was in my front brake as expected but blue blood was in my rear!
    There was a little bit of contamination front and rear but not too bad.

1. Raise brake lever to parallel.
    Freestroke all the way in. (oops - I didn't do this)

2. Remove wheel. Remove brake pads. Push back Pistons. Fit bleed block spacer. Clean things.

   Plastic tyre tool preferred to push back pistons but flat-headed screwdriver might be needed.
   Opening the lever reservoir might help push pistons back. 

   Fit in bleed block spacer.

  Inspect pads & clean caliper and rotor and maybe pads (VERY carefully) if they are contaminated.
  Set out to dry. Wipe off later with clean paper towels.
  Do not touch the face of the brake pads more than necessary. Use very clean brushes/other.
  Today rosemary sticks and leaves were used! !? yeah.

3. Remove plug nut at lever (careful of the o ring, keep it with the nut.)
    Gently screw on bleed cup (plugged).
    
4. At caliper, remove dust protector. 
    Prepare syringe hose with open hose end.
    Have 7mm wrench or allen/torx of right size ready for opening caliper.
    Fill syringe with clean mineral oil.
    Attach syringe to caliper nipple.

5. Unplug the cup at lever. 
    Open the caliper (1/8 or 1/4 turn). 
    Push syringe and push hydraulic fluid into caliper. (one video does a little pull here)
    If it is reluctant to go don't push too hard! Check correct lever is open. Open caliper a bit more.
    You will hear and see it coming into cup.
    Tap brake hose and caliper as you do this.

5.1. When all oil is pushed in then close the caliper.
       Plug the cup. Take it off. Pour old oil into old oil container. 

5.2 Kind of optional steps, reverse bleed, lever wriggles/squeezes, freestroke and lever adjust.
    Put cup on again. Put some some clean oil into cup.

5.2.1 Open caliper, reverse bleed (using bottle/baggy) to eliminate caliper air.
         Tap caliper and brake hose.

5.2.2 With brake lever pressed do quick open/close of caliper. 2 or 3 times.

5.2.3 Finished at caliper now. Wipe off. Plug. 

5.2.4 At lever squeeze lever in and out a few times, flick it a few times, 
          wriggle lever angle up and down, 
          screw in freestroke and lever adjust.
        Watch for bubbles coming up into cup.

5.3 Take off cup, replace lever plug nut and o ring.
    Oil flush with top, don't introduce air.

6. Finishing  up . . . brake pads back in . . wheel on.

    Wipe off and dry caliper, brake pads and rotor.
    Remove bleed block spacer.
    Re-install brake pads.
    Put wheel back on.
    Check wheel spins ok, pads free of rotor.

7. Put lever back in position.

   Squeeze lever a few times to move pistons back in so that pads grip rotor. 

Test ride. Careful now.

8. Clean syringe and bleed tools with soapy/wash up liquid warm water.

   Dry.

   Tidy away tools etc.


My commuter Ridgeback vanteo has shimano hydraulic brakes front and rear.
Front brake lever & caliper replaced a few years ago after lever damaged.

Front brake lever on right, shiny silver Shimano De-ore XT freestroke.
Front brake caliper has nipple at highest point and 7mm wrench nut on nipple to open at the caliper.

Rear brake lever on left, all black, original that came with bike.
Very little markings on lever or caliper except for Shimano and very small BL-MS55(or M855?) Malaysia 22.2. ? so maybe of the BL-M8000 series ?
The caliper has bleed nipple cover flush with side of caliper and separate bleed screw. 
A bit easier to use.

Rear brake lever - original to bike - on left.

BL-M855 ?

Rear brake caliper - FILTHY

Front brake lever on right.

Front brake caliper, pretty grubby. FILTHY inside.
Front brake caliper, a bit cleaner, with spacing block fitted.

FILTHY. Washing up liquid and rosemary to scrub.

Brake pad surface. Don't touch. ALOT cleaner.
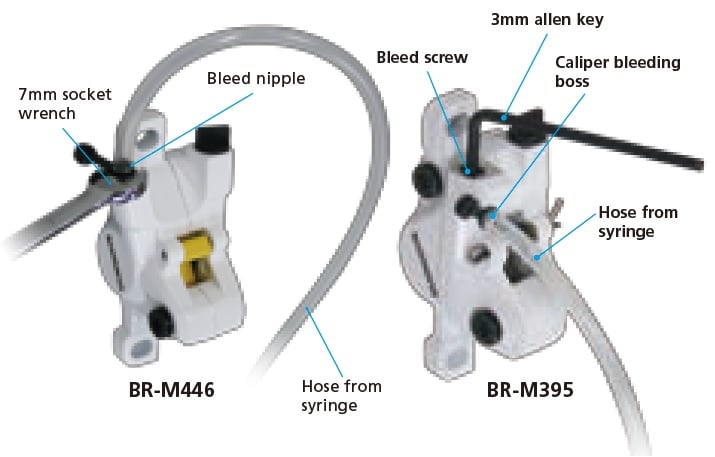


Diagrams here, 
 my front caliper is like the BR-M446 with 7mm wrench at bleed nipple,
 my rear caliper is like the BR-M395 with bleed nipple to side(but flush into caliper not sticking out) and separate bleed screw at 90 degrees. Easier to use.


6/6/2020Front and rear brake fluid replace/bleed.
31/5/2020http://gaoithe.blogspot.com/2020/05/cycle-over-to-ballycorus-and.html
MTB brakes out of action
lots of cycles on this bike
including MTB side of three rock like today, brakes went very squidgy not good on rattly MTB downhill run!! :-o Scary!
Got a bit more brake by adjusting at the lever.
When they cooled down and had a rest they came back.


RESOURCES:

12 steps, pretty good. Gravity bleed from top cup to bottom.
https://www.worldwidecyclery.com/blogs/worldwide-cyclery-blog/how-to-bleeding-shimano-brakes

Dealer's Manual Shimano Hydraulic Disc brakes
Cup on, syringe fluid in from bottom.
Then allow some back down gravity to eliminate air.
Lever squeeze and caliper quick open/close.
Lever action to eliminate air bubbles (and freestroke/lever adjust in other vid) cable and lever tilts/wriggles.

GMBN - How to Bleed Shimano Disc Brakes – Mountain Bike Maintenance
https://www.youtube.com/watch?v=COLd57jDvOE
Looks like genuine bleed. Dirty fluid comes out top.
Cup on, syringe fluid in from bottom.
Pro tip lever squeeze and caliper quick open/close allow fluid back down get air out of caliper reservoir.

GMBN tech - Bleeding A Shimano Disc Brake In Real Time  - 19 mins
https://www.youtube.com/watch?v=HggV5BFTRw8
Cup on, syringe fluid in from bottom.
Freestroke lever wriggles.
CLEAN everything.

GCN - How To Bleed Shimano Hydraulic Disc Brakeshttps://www.youtube.com/watch?time_continue=22&v=DsqlEYJeLQU
Cup on, syringe fluid in from bottom.
Simple, skips the fiddly extra air elimination steps.


future fun: DMW on bike . . .
maybe good for scout planning routes: https://www.dublinmountains.ie/fileadmin/user_upload/maps/dmw_map1_threerock_shankill_260418.pdf
 and  https://www.dublinmountains.ie/index.php?id=135 and https://www.dublinmountains.ie/fileadmin/user_upload/maps/kilmashogue_tiknock_all_routes.pdf